Part 2 Custom Glass Shower Design Tips
We continue our three part series of tips to planning your new glass shower enclosure. If you missed Part 1, check it out here: Spacial Considerations of Custom Glass Shower Design. After measuring and considering the amount of space you have for your new shower, here are some construction elements to think about when designing your new frameless shower enclosure.
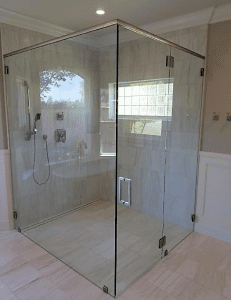
Support for Shower Doors and Hardware
Make sure the wall where you plan to install your hinged door has the proper support behind it. Doubled up 2x4s are best, but single will also work. In addition, provide wood studs or blocking where doors hinge or panels are anchored, especially if metal studs were used in original wall construction.
Glass Panel Widths
When designing you shower enclosure, keep in mind that each glass panel needs to be at least 4-1/2” wide and the door will need to be a minimum of 24” wide (22” of clear opening width is required to meet code). There are situations that may require hinging a door off a fixed glass panel including: layout concerns, moving the door away from an obstruction, or for a Neo-Angle shower. If this is necessary, the load bearing panel must be ½” thick glass, a maximum of 22” wide, and must employ heavy duty hardware. (The smaller the load bearing panel is the stronger it will be) Note: some building departments require the load bearing panel to be supported on three sides, which would require either a header, a support bar, or for the panel to be mounted to the ceiling.
Shower Curbs and Water Retention Considerations
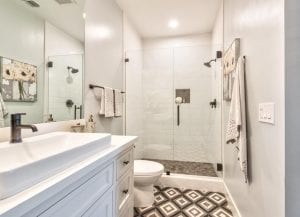 Do you want to install your shower enclosure on a curb, or would you rather have it flush with the floor? If you need the shower to be accessible, you may want to choose to eliminate the curb. No shower is absolutely water tight, but installing a curb will also help keep your bathroom clean, as it will stop the water from potentially leaking or pooling onto your bathroom floor.
If you do choose to install a curb, you will want to make sure that the contractor slants it inward at a 5 degree slope. Without this slope (also referred to as “Pitch”) the curb would have standing water on top or could leak onto the bathroom floor. When considering a curb top keep in mind that wider is better, and solid pieces of tile, marble, and granite are best for the curb top. The shower door seal functions best on a smooth surface.
Designing as deep a shower as possible will also help prevent leakage. The more space between the shower head and the glass enclosure the better. Narrow showers are more likely to leak as the water bouncing off the body while bathing is closer to the glass enclosure. You could also consider polycarbonate seals or a dam strip. Additional polycarbonate seals can be added to the door to improve water retention, this is ideally done in the design phase of the project as the glass measurements will change with the size of the seal chosen. A dam strip prevents the water that pools up below the door to flow outward. Adding a dam strip to a curbless shower, tub deck, or shallow enclosure can also improve water retention.
In part three of our series we’ll discuss shower head positions, glass tiles, substrates, glass transoms, raised tiles, and overhangs.
Click here to check out our our gallery, to get help with your frameless shower design and explore your glass options, contact Dick’s Rancho Glass online, give us a call, or visit one of our two glass showrooms in the Sacramento region:
Dick’s Rancho Glass Sacramento at 2900 ROUTIER ROAD
Or call us at (916)363-6554
Dick’s Rancho Glass Fair Oaks at 5349 SAN JUAN AVE.
Or call us at (916)863-2500
~ At Dick’s Rancho Glass our versatility and pride of craftsmanship are keys to our success. Our excellent reputation has been built on the foundations of quality, reliability, and maintaining a dedicated staff. ~
RELATED POSTS: